Most people who upload to Shutterstock for the first time focus on the photos. The platform is actually two problems: making images that meet technical standards, and writing metadata that puts them in front of buyers. Skipping either is why most new contributors stall.

What is a Shutterstock contributor?
Contributors upload photos, illustrations, and videos to Shutterstock's marketplace. When a buyer licenses your image — for a website, a presentation, a brochure, an article — you earn a royalty.
Most contributors make $50–500 per month once their portfolio is established. Top earners with large catalogs make significantly more. In the first few months, expect single-digit earnings while you build volume and learn what sells.
It suits photographers, illustrators, and videographers willing to treat it as a long-term side income, not a quick flip.
Step 1 — Create your contributor account
Go to submit.shutterstock.com and sign up. It's free. Account creation is instant — no application process, no waiting period before you can start uploading.
Set up your payment method before you upload anything. Shutterstock pays via PayPal, Skrill, or Payoneer. The minimum payout threshold is $25, so your first payment won't arrive until you've crossed that. Getting payment set up early means you won't need to dig through account settings once the money comes in.
Step 2 — Understand the technical requirements
Shutterstock has a short list of hard requirements:
- Format: JPEG or TIFF (JPEG recommended — all approved images are converted to JPEG). No PNG, no PSD.
- Minimum resolution: 4 megapixels. That's roughly 2000×2000 pixels. Most cameras and phones clear that easily — this floor weeds out heavily cropped or low-quality files.
- Color profile: sRGB. If you shoot or edit in a wider color space like AdobeRGB or ProPhoto, export to sRGB before uploading. Submitting in a different profile causes colors to shift during Shutterstock's automatic conversion.
- No watermarks, logos, or borders. Including your own.
- No compression artifacts. Export at 90–95% quality in Lightroom or your editor. Over-compressed files fail on sight.
Releases
People photos for commercial use require a model release for every identifiable person. Privately owned property — houses, storefronts, murals — needs a property release for commercial submissions.
If you don't have releases, mark the submission as Editorial instead of Commercial. Editorial images can't be used in advertising, but they don't require releases. More on this in Step 3.
Step 3 — Pass the initial review
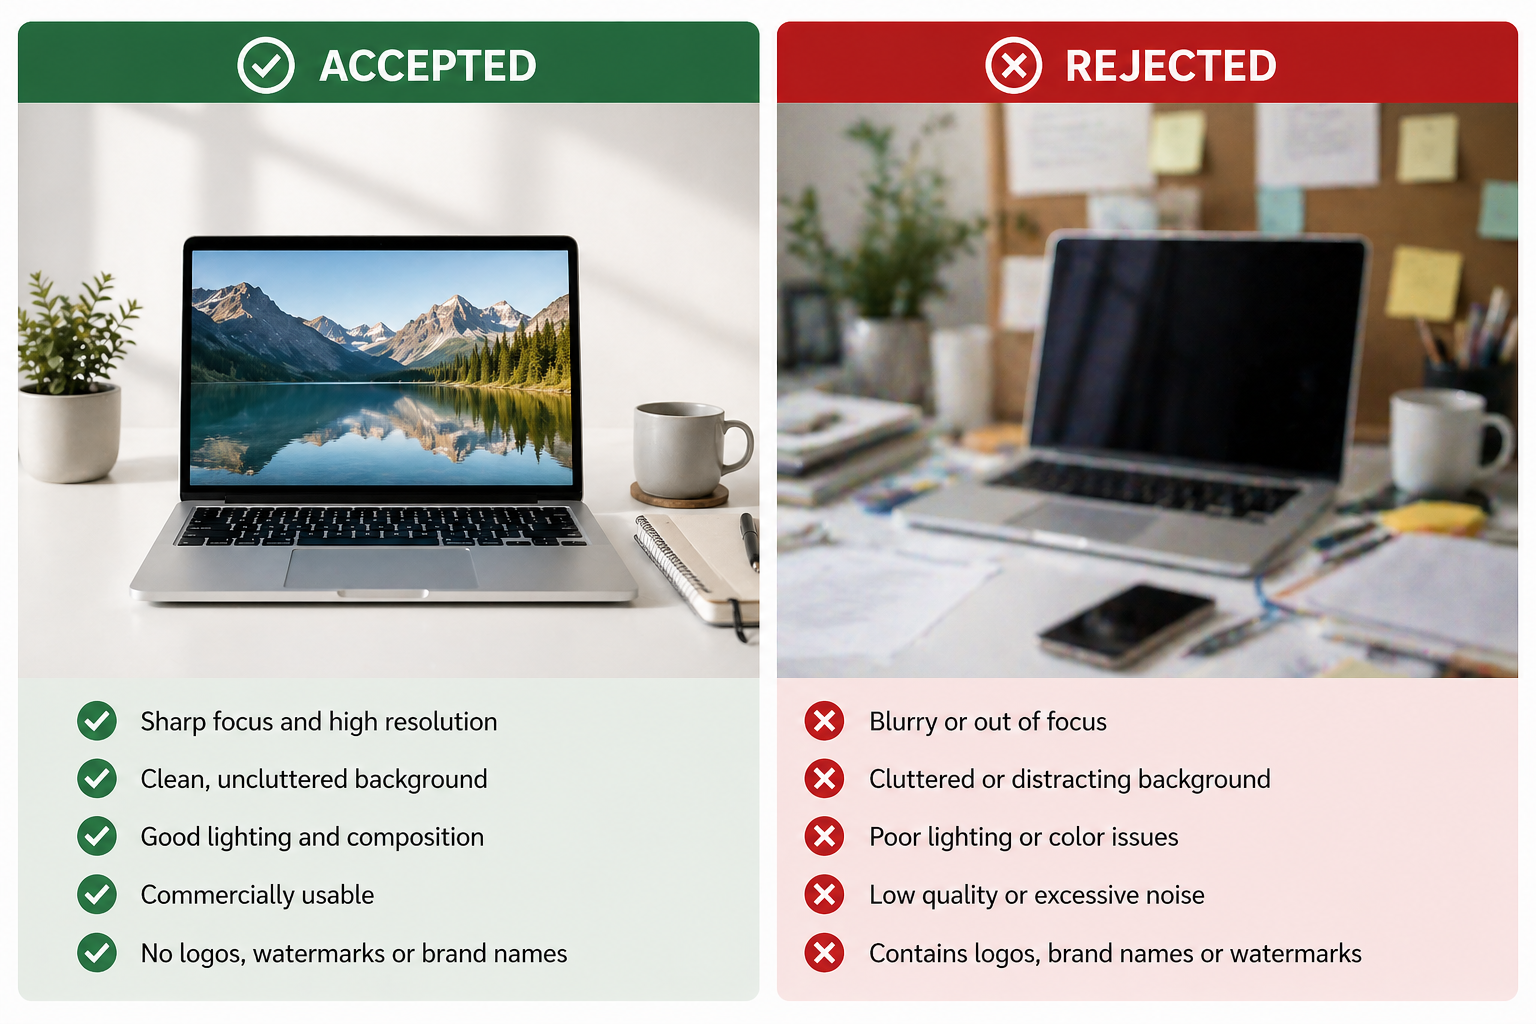
Your first submissions go through Shutterstock's review team, who check whether your files meet technical standards. Start with your sharpest, cleanest photos. This is not the time to experiment.
Pick images with:
- Clear focus throughout (or intentional selective focus that reads well)
- Correct exposure — no blown highlights, no crushed shadows
- Low noise — especially in shadow areas and skies
- Subjects that are identifiable and clearly the focus of the frame
The most common reasons new contributors fail the initial review:
- Focus issues — camera shake or missed focus. Use a tripod or faster shutter speed.
- Noise — high-ISO shots in low light. Shoot at lower ISO or run a clean denoise pass in post.
- Similar images — submitting five slightly different shots of the same scene. Submit one. Save the rest for later.
- Missing releases — an identifiable person in a commercial submission without a model release.
Commercial vs. editorial
This is a decision you make per image at upload.
Commercial means the image can appear in advertising and marketing materials. It requires model and property releases where relevant. Higher commercial value per license.
Editorial covers news, education, and documentary use. No releases required, but the content needs to document something real — not a staged scene with friends dressed up as doctors. Lower per-sale value, but no release overhead.
When in doubt: if you have releases, go commercial. If you don't have releases but the content is genuinely documentary, go editorial.
Step 4 — Write metadata that actually gets your photos found
Shutterstock is a search engine. Buyers type queries and get results. Your metadata determines whether your photo appears for those queries or not.
Put two technically identical photos side by side. One has thin metadata. The other is fully tagged with an accurate title, layered keywords, and the right category. The well-tagged photo will outsell the other by a wide margin over any meaningful time period.
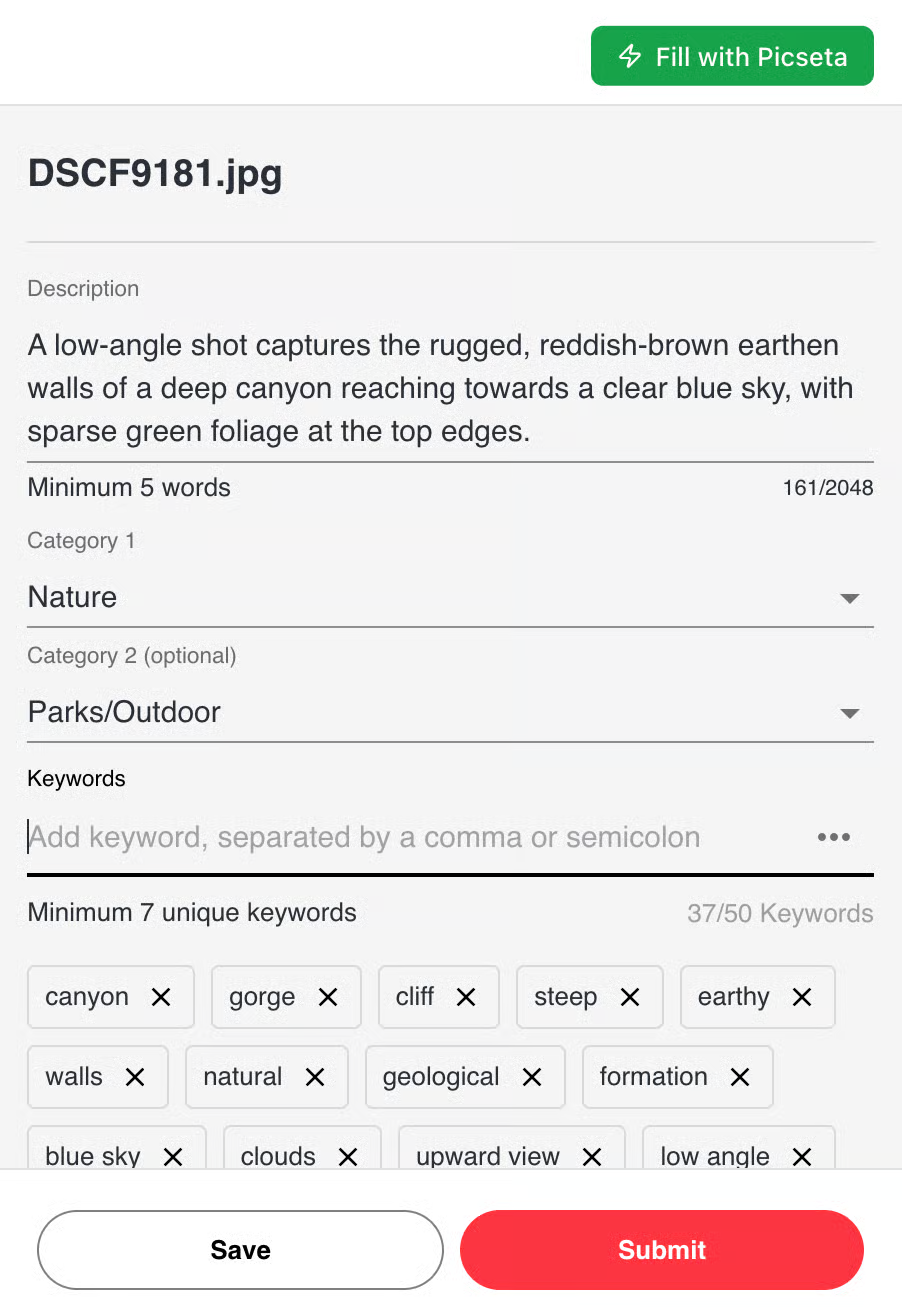
Title
5–15 words, natural language. Describe what's literally in the photo: the subject, what they're doing, the setting.
Good: Diverse business team collaborating in a modern open-plan office
Bad: Business meeting (too vague)
Bad: business, team, office, meeting, corporate, professional (keyword list — that's what the keyword field is for)
Shutterstock's algorithm indexes titles. Natural language describing the photo outperforms keyword strings.
Description
1–3 sentences. Add what the title didn't fit: mood, context, who the image is for.
Example: Cheerful older woman tending to a vegetable garden on a bright summer morning. Conveys active retirement, healthy living, and connection to nature. Works well for healthcare, lifestyle, and retirement planning campaigns.
That last sentence — "works well for..." — is often what separates descriptions that help buyers picture the use case from ones that just restate the title.
Keywords
Shutterstock allows up to 50. Use all 50.
Structure them in layers:
- Literal — what's physically in the frame (subject, objects, setting, colors)
- Conceptual — what it represents (success, teamwork, sustainability)
- Use case — what a buyer would use it for (website banner, annual report, healthcare marketing)
- Technical — how it was shot (copy space, overhead view, natural light, horizontal)
Order matters. Shutterstock weights earlier keywords more heavily. Put the most specific, relevant terms first. Don't open with generic terms like "photo" or "image."
For a full breakdown of keyword strategy, see the stock photo keywording guide.
Category
Shutterstock has around 29 top-level categories. Pick the one that describes the main subject — not the setting, not the mood. A doctor photographed outdoors goes in Healthcare, not Nature. The subject is the doctor.
You can add a secondary category if the image genuinely spans two areas.
Metadata is the part most contributors rush. It's also the part that determines whether your portfolio earns for years or stays invisible. Tools like Picseta generate complete metadata from your photos automatically — title, description, all 50 keywords, the right category, and commercial vs. editorial classification.
Step 5 — Build your portfolio consistently
Volume matters for stock photography, but scattered volume doesn't. 200 photos of one subject — business professionals, food preparation, urban architecture — consistently outperforms 200 random photos spread across every topic.
Buyers search by subject. If you have 50 photos in a niche, Shutterstock's algorithm learns to surface you for those searches. If your catalog is scattered, you compete against thousands of contributors in every search but you're nobody's first result.
Upload in batches on a set schedule rather than one photo at a time. A weekly session of 20–30 images beats uploading sporadically. The rhythm matters for approval timing, portfolio growth, and your own momentum.
What to expect in the first 3 months
First sales typically arrive after 50–100 approved images. If you're not there yet, that's a portfolio problem, not a market problem.
Watch your earnings-per-image breakdown in the contributor dashboard. Shutterstock shows you which images are being downloaded. After 50–100 approved images, look at what's earning and shoot more of that. Don't try to guess what sells before you have data.
Most contributors hit $25 (the default payout threshold) sometime in months 2–3. Consistent monthly income — $100+ — usually starts building after 200+ approved images with solid metadata.
The most useful thing you can do in these early months isn't shooting more photos. It's making sure everything you've already shot has complete, accurate metadata. Most contributors skip that work, then wonder why their portfolio isn't earning.
How much can you earn as a Shutterstock contributor?
Shutterstock pays 15–40% royalty per sale across 6 earnings levels. Starting contributors earn 15%; levels increase as you accumulate downloads within the calendar year and reset every January 1. A standard subscription download pays a minimum of $0.10, with higher amounts at higher levels depending on the customer's plan and license type. Most contributors with established portfolios earn $50–500 per month from Shutterstock alone.
How long does it take to get approved on Shutterstock?
Shutterstock does not publish specific review timelines. The help center states the team "works promptly." There's no waiting period to create your account — you can start uploading the same day you sign up.
Do you need a model release for Shutterstock?
Yes, for commercial-use submissions that include identifiable people. If you have a signed model release, mark the image commercial. If you don't have a release but the content documents a real event or public place, mark it editorial. Editorial images don't require releases, but they can't be licensed for advertising use.